Canning 101 - Learn the Art of Preserving Food
Author: Janice Bett
Book Series: Natural Product Series
1. Do You Want to Preserve Food and save Money?
It wasn't all that long ago that people, everywhere, would preserve their food and would eat from their stock of saved food throughout the year. In some cases, they would even be able to save food for multiple years and along with it, they were saving money. Unfortunately, the art of preserving food through canning and through other preservation methods has, for the most part, gone by the wayside. It is still important to consider, however, and as this publication will make clear to you, it is something that you can do at home fairly easily if you have the right equipment.

The first thing that we are going to discuss is why you would want to preserve your own food. Quite simply, we live in a society that offers an almost endless supply of foodstuffs, and it doesn't matter if we are purchasing them at the grocery store or at a local restaurant, it seems as if that supply is never going to run short. In reality, we live in a relatively precarious situation and it really only takes one event, either on a personal level or on a worldwide level to make it very difficult for us to have the food that we need. That is one of the benefits of preserving your food that will be discussed in this publication, the fact that saving food may help to preserve your life.
You might also be surprised with the types of foods that can be preserved through the canning process. When most of us think about canning, we may think about our grandparents putting up jar after jar of peaches, jellies or even salsa. Of course, it certainly is possible for you to preserve those types of food through canning, but that is not your only option that you have available. The fact of the matter is that there is a wide range of foods that can be preserved in this way and we will introduce you to those various options in this publication.
The meat and potatoes of this book is going to be in chapter 4, which talks about the basics of canning food and what you will need in order to take part in this exciting and sometimes, lifesaving pastime. You will be amazed with how easy it is to can food, but it is still important for you to have the right type of equipment and the right know-how so that everything works well. After all, if you can your food properly, you will have something set aside for many months and even for years to come. If you don't do it properly, however, you could become sick.
In fact, we're going to discuss some of the dangers of canning your own food in this publication. It is not done with a view to frightening you into avoiding the habit of canning, it is to provide you with the information that you need so that you can avoid the problems that do exist. As long as you do things properly and take your time to ensure that everything goes smoothly, you will have very little to worry about. Understanding the potential problems that could occur, however, can help to add to your knowledge base and will allow you to avoid the more common dangers of canning.
Although the bulk of this publication is going to talk about canning food, and there are many options that are available, it is not the only type of food preservation that you should consider. The fact of the matter is that there are a number of different ways that you can preserve food and have it available for quite some time so that it can go on your dinner table. Discussing various other methods of preserving food can give you a greater overview of the options that are available, and you might even find that there are some options that you want to consider trying along with canning.
Do you have a garden? If you are canning food because it is an economical choice or if you simply want the best option available for the health of your family, you can't beat the benefits of growing your own garden. If you have a lot of space available outdoors, it is likely that you have tried this at some time in the past. Perhaps you even have a small garden available in your backyard, providing some vegetables for the dinner table. In reality, it doesn't take much time or space to grow a canning garden. Simply put the right plants in place and you will have plenty to eat, even when the growing season has ended.
Although there are a wide variety of reasons why people may want to learn how to can food, one of the more common reasons is because of survival. We certainly do live in a world that is ever-changing and at times, it can be very frightening. That is especially true if you think about the possibilities of having to rely on the government or on its citizens for the food that we need in times of trouble. Canning your own food can provide for you in case something should happen to go wrong and food becomes scarce.
Of course, there is more to planning for survival than simply learning how to preserve food. Yes, canning food is a primary part of it, and it can help you to have food put aside for years in a relatively safe manner. We will have a brief discussion of planning for and storing food for the needs of your family for the long-term. This can either be done for convenience sake or it can take on the form of a survival pantry that will help you sleep better at night.
The art of canning may be temporarily lost, but it is easy to learn. By following the information that is provided in this publication, you can stick with the process and before you know it, you will have your own pantry shelves lined with your own food that will last you for quite some time.
2. Why Should You Know about Preserving Food?
Although this publication is really for anyone and, regardless of whom you are, you can benefit from the art of preserving food, there are some specific benefits that need to be considered. You will find that these benefits are made available, simply by taking part in this pastime. In addition, there may be other benefits that are not explored in this chapter that are more specific to your circumstances. In either case, it is something that you would want to keep in mind because, when you know the benefits, it can be motivational and help you to put your best foot forward.

Health - One of the primary benefits of canning your own food is the fact that you have a ready supply of healthy food at your disposal. Although it certainly is possible for you to purchase canned food at the grocery store, you do need to be concerned about what is actually going into the food. In some cases, they may not even list it in the ingredients! When you can your own food, you don't need to be concerned about what is in it, because you know what is in it. In addition, canning in glass jars is a much healthier choice than buying food in aluminum cans.
Money - It is a matter of simple economics that you are going to save money when you can your own food. Yes, you will have an initial expense of purchasing some items for canning, but those items can be reused on an ongoing basis. In addition, you will have to purchase the food that goes into the can, unless you're able to grow the food at home on your own. In either case, however, having a ready supply of your own food available through canning is going to help you to save money, and lots of it.
Convenience - There is a certain level of convenience that is associated with building a pantry that is full of your own foods. Of course, you would be able to do so using perishable items but the shelf life is so short-lived that you would not be able to keep a lot of it on hand at any given time. When you can your own food, however, it is a much more convenient choice because you can simply go to your pantry and grab anything that you need in order to throw a quick meal together for your family.
Options - When you think about canning your own food, what is the first thing that comes to your mind? If you're like most people, you think about canning some fruits and vegetables in a way that was similar to what was done by your parents or perhaps your grandparents. In reality, however, the options that are available when you can your own food are quite significant. Not only are you able to preserve fruits and vegetables, you are able to can a wide variety of foods, including baby food, meat and salsa. When you take advantage of those options, everyone in your family will benefit.
Heirloom Varieties - When you go to the grocery store, you are somewhat limited as to the types of fruits and vegetables that are available. Even though importing of those food items may take place, you may still find that there are times when you are unable to get the type of food that you want. When you can your own food, however, it is possible to can a wide variety of items, including some different heirloom varieties. If you have a desire for a specific taste during the off-season, you don't need to rely on importation through the grocery store, simply go to your pantry.
Sugar - Many of us are concerned about our sugar intake and for good reason. According to many of the experts, a diet that is too high in sugar can lead to a wide variety of problems, including obesity, type II diabetes and early death. Unfortunately, many of the foods that are pre-canned and line the grocery store shelves are loaded with sugar as a type of preservative and to help to give the food additional flavor. Although you may choose to put some sugar into the foods that you can, you are going to use much less in most cases than what is available at the grocery store.
Environment - It is becoming increasingly common to be environmentally aware. Perhaps you have thought about the environment yourself, either on an individual or perhaps even on a global basis. Although we may do our best to reduce our carbon footprint, we may still be filling the landfills with a wide variety of items that come from the grocery store. Even if you recycle, it is likely that some of them are still going to end up in the landfill. When you can your own food, however, you're doing something that is much better for the environment.
Chemicals - We have discussed a number of chemicals and unwanted additives that may be included in store bought food. Unfortunately, the packaging that is associated with those foods may leach chemicals into the food as well. One of the types of chemicals that can find its way into your food is BPA, something that comes from an epoxy that is used in canning and pre-packaging many different types of commercial foods. It can have a devastating effect on your body, including affecting the behavior of infants or affecting our prostate gland and our brain.
Fun - Another thing that you should consider when choosing to can your own food is the fact that it is a lot of fun. If you're doing it on your own, you will have the pride of accomplishment as you see your pantry fill with healthy food options. If you're doing it as a family, you may find that it offers an excellent opportunity for a fun family project. You can do it on the weekends, scheduling the time to be together and enjoying canning some food rather than sitting together and staring at your smartphones.
These are just a few of the many different options that are available when you can your own food. You might be surprised to learn that you will experience many of these benefits very quickly once you get started. The benefits are not only going to be seen while you're canning the food, you will continue to enjoy them as you eat the food as well.
3. What Type of Food Will You Preserve with Canning?
Although you may want to limit the types of food that you can to one or two varieties, you certainly are not limited to those options. The fact of the matter is that there are many different types of foods that can be preserved through canning and if you do it properly, you have much of the food that you would need to preserve yourself and your family during times of difficulty.

Although it can be broken down into each individual type of food, in most cases, it is enough to simply look at the food by the type of acid that is present in it. After all, there will be a difference in the way that you can these foods, depending on the type of acid that is present within them. For high acid foods, you will not need to worry about botulism because it will not be able to grow in that type of acidic environment. In low acidic foods, however, it is necessary to can specifically by raising food above a certain temperature. We will discuss more about that factor and another chapter of this publication.
The low acidic foods are typically those that have a pH value of more than 4.6. They include seafood, meat, dairy products, poultry and vegetables. Highly acidic foods include pickled vegetables and fruits. Aside from those basic differences, the sky is really the limit when it comes to the types of foods that you are going to can and preserve for your family.
You should also consider the possibility of preparing certain types of foods that can be a convenience for your family. The following are some of the pre-prepared foods that you may want to consider putting up in your pantry. You may also want to consider canning some whole foods, such as cherries, apricots and tomatoes but these pre-prepared delights will also be a welcome addition during the off-season.
Salsa - One of the more popular items that can be canned is salsa. It is an option that you may want to consider, especially if you love this type of food. In reality, salsa is not only a food that can be enjoyed with some chips as a snack. It can also be used as a base for many delicious dishes and it can be added to others in order to enhance the flavor and to make it somewhat unique.
Chili Sauce - Many families love the taste of chili and it becomes a very popular dish when the weather gets cold outside. If you are somebody that takes your chili preparation seriously, you would not want to have to rely on food that comes from the grocery store. You can pre-prepare your own chili sauce and put up a few jars of it to use throughout the winter when you feel like adding some zest to the dinner table.
Pasta Sauce - You don't need to be Italian to enjoy the fresh taste of pasta sauce in your favor pasta dish. In fact the matter is that it is a great way for you to use up some excess tomatoes during the growing season or when the growing season is coming to a finish. When you make your own pasta sauce, you're going to enjoy the fact that it is making the house smell fantastic when you're making it and you can make lots of it, putting it up in the canning pantry for use throughout the winter when you don't have access to fresh tomatoes.
Jellies And Jams - Another option that you may want to consider for adding food to your canning pantry is to make some jelly and jams that will last you throughout the off-season as well. These tend to be more of a treat than the other types of foods that are canned, which provide more of a staple food for your family. When you have plenty of jelly and jam available, however, you will be able to use in a wide variety of recipes or you can simply enjoy some on a slice of bread. In either case, you can enjoy the fact that you made it yourself and preserved it for use during the winter.
A Brief Look at the History of Canning
It is also good to understand the history of canning, because it can help you if you are running out of ideas for what to put up in your pantry. In addition, understanding the basic roots of your hobby can help to enhance your enjoyment of it significantly.
Many of the innovations that we have available at our disposal today and often take for granted have come about as a result of war. To be certain, wartime is often a time of want and many people find themselves in a situation where they don't have enough food, clothing or the other necessities of life. That is actually where the process of canning came about, and was first done in the early 1800s.
During that time in history, the French government was very interested in preserving food because of the wars that Napoleon was waging. As food became a very limited commodity, preserving it became essential so the French government offered 12,000 Francs to anyone that was able to find a way that food could be preserved for a long time inexpensively and easily. Not only would this way of preserving food provide a benefit to the people of the land during the time, it would also prove to be a significant wartime advantage to the French army as well.
It was a confectioner and brewer by the name of Nicholas Appert that came up with the basic idea of canning as a way to preserve food. He knew that it was possible to preserve food for a long time inside of the jar if the food was cooked in advance. The only thing that would keep the food from being preserved for a long time is the possibility of the seal of the jar leaking. Even though there was limited knowledge at the time and nobody knew why food spoiled, it was known that it didn't spoil if air was not allowed to get to it.
One of the problems with canning food for this reason is the fact that it would need to be transported for long distances in glass containers in order to be beneficial to the soldiers who were fighting the wars. As a result, the food was preserved in iron or tin canisters so that it could be transported to the troops safely. This presented another problem, however, because there wasn't such a thing as a can opener at the time. The French troops needed to use knives or a bayonet to open the cans or they could hit them against a rock until they opened.
The Napoleonic wars ended before the process of canning could be perfected, but it was a process that continued to gain use across Europe and even in the United States. Eventually, more modern methods of canning came into being and many of those methods are still used to this day. It is still the basic principle of heating the food in advance and making sure the jars seal properly that allows food to be stored for a greater amount of time.
4. Canning Basics - Learn How to Do It Right
We have discussed the benefits of canning food and some of the many different types of foods that can be canned successfully. In this chapter, we are going to discuss the basic canning method and how you can easily produce the high quality canned foods at home so that you will have them available throughout the off-season or even for a number of years. You will be surprised to learn that the science that is associated with food canning has not really changed much in recent years, as it is still the basic principle that allows the food to be preserved in this way.
Understanding the Science behind Food Preservation
As we discussed in the previous chapter, during the early time when canning was first being experimented with during the Napoleonic wars, it was not fully understood why it worked. It was known, however, that heating food inside of the jar and sealing it would allow the food to be stored for an extended amount of time without spoilage. What was not known, however, is why food spoiled, and it would be another 50 years before Louis Pasteur came up with the process of pasteurization, which also used heat kill microbes that were spoiling the food.
Some types of foods, including those that are highly acidic, are able to be stored without too much preparation. The high acidity in the food would not allow the bacteria to grow that could lead to botulism. Other types of food, however, will need to be boiled in advance to kill any bacteria that are on it and then it will need to be transferred into a sterile jar to keep the bacteria from growing. It is something that can be done safely, if it is done properly.
Water Bath Canning
The most basic type of canning is known as water bath canning, and this type of preservation can only be done with highly acidic foods. It is not necessary to cook the food in advance in order to kill the bacteria, because it will not be able to grow on the food within the canning jar. Some of the types of food that can be preserved through water bath canning include berries, tomatoes and pickled cucumbers in vinegar.
The basics of water bath canning are relatively easy to understand. It is just a matter of filling the jar with the acidic food and then putting it inside a tub of water and bringing the water to a boil. The boiling water is not there to kill the bacteria that are on the food, because they are not able to grow in such an acidic environment. The boiling will, however, seal the jars and help to keep them from spoiling. It is also going to force the air out of the jars that could be problematic.
Pressure Canning
Many other types of food are going to need to be canned through a method known as pressure canning. There are many modern pieces of equipment that can allow you to do this quickly and easily and it is a relatively inexpensive hobby to get started. The benefits of taking up pressure canning is that it allows you to can many more types of foods and once you own the equipment, you will be able to continue to use it year after year. The following are some of the pieces of equipment that you may need to purchase if you don't already own them.
A Large Pot - One of the primary pieces of canning equipment is a large pot that is used to boil water with the canning jars included in it. You should make sure that the pot is large enough so that you can insert the canning jar down into it with room for boiling.
Pressure Canner - Although there may be various methods available for canning food without this device, it is the only way for canning that is recommended by the United States Department of Agriculture. If you have a pressure canner, you can get by without the large pot but you will still need something to boil water in so that you can sterilize the equipment that you are using. There are a number of benefits available when you use a pressure canner, including the fact that you are canning food at a temperature that is higher than boiling. In addition, the air that may be inside of the canning jar is going to be removed because of the pressure, so you will not have to worry about bacteria getting into the food once the seal takes place.
Since the pressure canner is going to be the primary piece of equipment that you use for canning, it is important for you to choose one that is right for your needs. For those that are on a very strict budget, you can get a pressure canner for approximately $60 but don't be surprised if you see some options that are available that can cost several hundred dollars. In part, it has to do with the size of the canner but it also has to do with some of the options that may be available with it as well.
Some families will want to start with a less-expensive unit to see if they are going to enjoy canning and if it is going to be beneficial for them. If you have not yet looked at the chapter on the benefits of canning, it would certainly be worth your time to look at it right now. As long as you're willing to invest the time necessary to preserve your own food, the benefits are going to be there for you. You can end up saving a considerable amount of money by purchasing the right canner from the start, rather than purchasing an inexpensive unit and upgrading within a few months.
You should also consider the brand name of the canner, because that can make a difference in the quality of the unit. In some cases, choosing an item by brand name is nothing more than paying for expensive advertising but that is not the case when it comes to canning products. After all, there are not many canning commercials that you see on TV or in other publications. In most cases, you are going to get what you pay for and that includes paying for a higher-quality brand than choosing an off brand.
Make sure that you also consider the size of the canner, because it can make a difference when you're trying to can a lot of food at one time. You may find that it is less expensive to purchase a smaller unit but you will end up spending a lot more time canning food than if you purchased a larger unit. It really depends upon your needs, but getting one that is somewhere in the mid-range or perhaps a little bit larger is typically going to benefit you by saving time, even if there is an initial output of money.
Glass Jars with Lids and Bands - You will also need a supply of canning jars and these can typically be used from one season to the next, provided they have not been damaged in some way or another. It is also possible to reuse the bands that hold the lid in place, although you would also want to inspect them for any damage that may have occurred. As far as the lids are concerned, you should always start with new lids so it is important to have a supply of them on hand at any given time.
Utensils - In most cases, you will have the necessary utensils for canning food at home. A set of wooden spoons is going to be very beneficial, as will a funnel and a ladle. Make sure that you sterilize these items in advance of using them by putting them in a pot of boiling water for a few minutes. Although you are also going to be sterilizing the mixture and sealing the jars, it is best if you don't introduce any contaminants to the food that is in the canning jars.
Food - Obviously, you would also want to have the food available that would be used in canning as well. In addition, you can find many interesting and delicious canning recipes that would allow you to prepare the food in the way that would make it more palatable when you open the jar.
Optional Items for Canning
Although you can get by with the items that are described above, there are a few optional items that you may want to consider purchasing as well. These can help to make it more convenient to can your own food and they can save you both time and frustration in the long run.
Jar Lifters and Handlers - Transferring the hot jars from one area to another can be problematic. Although it is possible to do this without any type of specialized tools, having a set of jar lifters and handlers on hand is going to make your life a lot more convenient. They are relatively inexpensive and they can be used from one canning season to the next.
Ball Jar Sure Tight - This tool can be purchased for approximately $10 and it is worth its weight in gold. Again, it is not absolutely necessary for you to have this particular tool but if you have a difficulty tightening the band because of arthritis or other difficulties, it can make it easy for you to know that the band is tightened properly.
The Simple Canning Process
The process of canning is not difficult, but you need to follow a specific set of rules if you want to do it properly. Canning your food the right way is going to provide you with a nutritious option from your own pantry. Canning it in the wrong way could result in some serious problems, including food poisoning. The following are the necessary steps to take when you can your own food.
1. Inspect - Before you can any food, it is important to inspect all of your equipment that will be used during the process. This is especially true if you are reusing canning jars or bands. If you find any potential damage to these items, it is best if you remove them from the mix and purchase something new. You are taking a real chance if you use any jars with cracks or nicks or if you see damage to the bands.
2. Wash - All of the bands, jars and lids that are used in canning should be washed in hot, soapy water and rinsed thoroughly. You should set them off to the side to dry while you are preparing the rest of the equipment for canning.
3. Heating Jars - Fill a pan of water on the stove to the extent where it will cover half of the canning jars. You can put some of the water into the canning jars to keep them from floating during the process. The water that is in the pan should be hot but you will not want it to be boiling at this point. Keeping the jars hot during this time will help to sterilize them to a certain extent but it will also keep them from cracking when you transfer the hot food into them. You don't need to heat the bands or lids at this time.
4. Prepare Pressure Canner - Add approximately 3 inches of water to the bottom of the pressure canner and heat it over medium to medium-high heat. The water should be simmering at this time and you should allow it to continue simmering while you put the food into the jars and place them into the canner.
5. Fill Jars - At this point, you will want to remove the jars from the pan of water using a jar lifter, if you have it available. Empty out the water that is inside of the jar and then fill it with the pre-prepared food from your recipe. In some recipes, it will be necessary for you to remove any air that is trapped within the food by rubbing a spatula along the inside of the jar or by using a tool that is known as a bubble remover.
6. Clean Rims - Before placing the jar into the pressure canner, you should use a damp, clean cloth to remove any food that may have gotten onto the rim of the jar or on the threads. Make sure that you don't skip this step, because it will affect the ability of the jar to seal properly and could result in the spoiling of the food. Transfer the jars into the canner and make sure that the water remains approximately 3 inches high.
7. Lock and Process - During the initial phase of canning, once the jars are in the pressure canner, you will allow the steam to escape while it is heating. The temperature should be set to medium-high at this point to increase the temperature inside of the canner. Venting the steam for approximately 10 minutes will help to ensure that there is no outside air that is left inside of canner. At this point, you can close the vent and begin to adjust the temperature until the pressure is at the desired level.
It will take some time to process the jars but you should continue to monitor the pressure to make sure that it is within acceptable limits for the recipe that you use. After it has been processed, you can remove the canner from the heat and allow the pressure to naturally return to zero. You would not want to vent the canner during this time, as that would affect the amount of processing that took place. After the pressure has reached zero, wait an additional 10 minutes and unlock the lid. Make sure that you have the canner facing away from you in case there is still some pressure left inside of it.
8. Remove Jars - After you open the pressure canner, wait another 10 minutes and then remove the jars from it and set them on a towel to the side. Obviously, the jars are going to be hot so you would want to use your jar tool to remove them easily without burning yourself. Let the jars sit for up to 24 hours without disturbing them or the bands. If you tighten the bands during this time, it may affect the seal and the food inside of it.
9. Check Seal - After 24 hours has passed, you should check the seal on each of the jars. The easiest way for you to do this is by pushing your thumb down on the center of the lid to see if it flexes. If it is properly sealed, you will not be able to push it down as it will already be down because of the vacuum that exists inside of the jar. If the lid flexes, the seal has been compromised. At this point, you should remove the bands and try to pull the seal off with your fingers. Obviously, if you are able to pull the seal off of the jar, the seal did not work.
Don't be concerned if some of the jars did not seal properly. It is a relatively common occurrence and it is not one that is going to necessarily affect your ability to enjoy the food that is within the jar. If you find that the seal has been compromised, immediately put the jar in the refrigerator and eat the food within a few days.
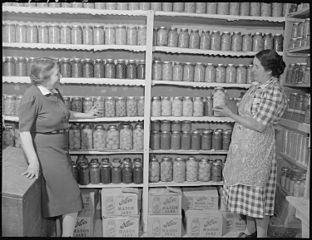
10. Label and Store - The jars that did seal properly are ready for storage. Make sure that you labeled the jars including what is inside of them and the date that you did the canning. You can then put them in your pantry for up to a year. Preferably, the pantry should be dark, dry and cool. We will discuss more about preparing your pantry in another chapter of this publication.
5. The Dangers of Canning and How to Avoid Them
Although the process of preserving your own food through canning is relatively simple and straightforward, there are also some potential problems that could occur if something goes wrong. Fortunately, many of those problems are easy to resolve, and if you recognize the possibility of them occurring ahead of time, you can often avoid them. In this chapter, we are going to take a look at some of the dangers and problems associated with canning and how you can successfully do it while overcoming these problems.

Loss of Liquid in Glass Jars
One of the more common problems that can happen when you are canning is that you will lose some of the volume inside of the glass jar because the liquid dissipates as you are processing. This is not a sign that the food has spoiled or that there is an issue with the seal of the jar. It is important that you do not open the jar to add additional fluid once the processing has taken place, or it will potentially spoil.
There are a number of different issues that could result in the loss of liquid from your storage jars. One of the problems is that you reduce the pressure inside of the canner immediately after the jars processed. This is easily avoided by allowing the pressure to go to zero naturally without venting the steam. Another common issue that could result in loss of fluid is that the pressure fluctuated during the time that it was processing. If you maintain the temperature within the pressure cooker and therefore, maintain a proper pressure, it will be less likely for this to occur.
Other reasons why there may be a loss of fluid can include a problem with the seal, in which you may not be able to store that particular jar. If the seal is compromised, put the jar in the refrigerator and eat the food within a few days. If the recipe called for you to remove air bubbles from the jars and you didn't do it properly, it could result in a loss of fluid as well. It may also be a problem with the bands not being tight enough or the food inside of the jar may have absorbed some of the liquid.
Food Discoloration at the Top
Many people are concerned about the food changing colors in the jar, especially if the food at the top of the jar gets dark. Although in some cases this may be a sign that the food has spoiled, that is not always the case. It may have been a problem with air that was permitted to remain inside of the jars when they were sealed or some of the food may be above the liquid level inside of the jar. You can avoid these problems by completely covering the food with syrup or water before you can it and removing air bubbles before sealing the jars.
If the Liquid Becomes Cloudy
Another source of concern is if the liquid inside of the canning jars becomes cloudy. In some cases, this could be an indication that there is spoilage and you may need to throw out the batch. Don't be surprised, however, if there are other issues that could lead to this type of cloudy liquid.
For example, if you can starchy vegetables, it may make the liquid cloudy and minerals or additives that are in the water or the salt that is used may also be problematic. In order to avoid these problems, use a soft water source and refined salt for canning. You should also choose vegetables that are either less starchy or can them when they are mature but not over mature.
Floating Fruits
At times, you may find that your fruit is floating inside the jar and this can cause some discoloration on the fruit that is above the liquid line. This may also be a problem with some vegetables but it is more common in fruit.
Some of the common reasons why your fruit may float include air that is trapped inside of the container, using fruit that floats easily, or not packing the jars properly. In order to overcome these problems, pack the fruit well, but use caution that you don't crush the fruit and bruise it. You should also use hot packs and choose fruit that is ripe but firm.
When Food Spoils
It doesn't matter how hard you try or how experienced you are with canning, there are going to be times when the food spoils. This is one of the most difficult problems with canning and it is one that can be avoided to a large extent. The following are some of the reasons why food may spoil and how you can overcome the problem in the greatest way possible.
Wrong Temperature - One of the most common reasons why food spoils is because it wasn't in the pressure canner at the proper temperature. Some acidic foods, such as fruits and pickled cucumbers don't need to be boiled before they can because they will not grow the botulism bacteria. If you are canning any other type of food, it is important to process it at the proper temperature so that the bacteria are killed.
Wrong Processing - When you look at the manufacturer’s instructions and the specific recipes for the food that you are canning, you will notice that there is a time limit for how long the food needs to be processed. Don't allow yourself to get off track and process the food for the wrong amount of time. In addition, you should only fill the jars appropriately and not overfill them, because that can affect the processing time as well.
Reusing Seals - The lid that you use for canning your food should always be new. They are very inexpensive and you can purchase them in bulk in most department stores. Never reuse the seals, because any imperfection in the seal could put you at risk for food spoilage.
Food on Rim - One of the important steps in processing and canning food is that you wipe the rim and threads with a clean, damp cloth. Any food that got onto the rim of the jar could affect the seal and cause the food to spoil.
Imperfect Jars - The canning jars that are used for preserving food are relatively inexpensive and you can purchase them in most grocery stores and department stores. Make sure that you inspect the jars before you use them and discard them if there are any chips or cracks. If any type of a defect exists in the jar or the band, it could result in food spoilage.
Wrong Pressure - One other reason why you may have a problem with food spoilage is if the pressure gauge is not reading properly. It is important for you to have the pressure gauge checked every year before you can food and to calibrate it, if possible. Processing your food at the wrong pressure can be a real problem and it could result in all of the food spoiling.
What to Do If the Seal Is Bad
Immediately after processing your jars, they will be set off to the side for 12-24 hours. After that time limit has expired, you will check the seal by pressing your thumb down in the center of it and making sure that it doesn't flex. You should also remove the band and ensure that you can't pull the lid off with your fingernail. If any type of a problem with the seal exists, you should immediately refrigerate the food and eat it within a few days.
It is also important for you to check the seal before you use the food after storage. The method of checking the seal is the same, you would make sure that there is not any flex in the lid by pushing on the center of the lid with your thumb. If there is any flex in the lid, you should discard the contents.
6. Additional Methods of Preserving Food
Although the primary focus of this publication has been on the canning process, it is not the only way to preserve food. The fact of the matter is that food has been preserved for thousands of years before the canning process was ever even dreamed up in the early 1800s. In this chapter, we are going to talk about some of the different ways that you can preserve food. You will find that some are beneficial now when we have access to all of our modern conveniences but there are also ways to preserve food in a pinch when the need arises as well. Familiarizing yourself with these different methods can benefit you in numerous ways.
Freezing - This is perhaps the easiest way to preserve food and it is something that all of us have access to at this time. With the right process, it is possible to freeze any type of food and to keep it frozen for an extended length of time so that you can use it for food when the need arises. Some of the different types of foods that can be frozen easily include meat, vegetables, fruit, grain, seafood, dairy, eggs, nuts and foods that have been pre-prepared.
You should recognize that freezing in your regular refrigerator freezer unit is not the same as true freezing for extended storage. In most cases, the freezer that comes with your refrigerator is going to be between 10° and 32°F but the temperature will also fluctuate, because we tend to open the freezer on a regular basis. Purchasing a freezer that is a standalone unit is relatively inexpensive when you compare it with what you get in return.
Fermenting - This is an ancient type of preserving food and it can also be used for a wide variety of purposes. Some of the types of foods that can be fermented include meat, vegetables, fruit, grains, seafood, dairy, legumes and eggs. In addition, the fermenting process can be used for producing various products that are quite popular. For example, it is the fermentation process that allows us to enjoy a fine glass of wine and the same process allows us to enjoy sauerkraut. Yogurt is also produced through fermenting.
Fermenting can take a little bit of practice but it is something that can be beneficial if you understand how to do it properly. In addition, there are differences in the way products are fermented from one item to another. In essence, you are using bacteria to preserve food but only specific types of bacteria. The other type of bacteria, which can cause the food to spoil, is avoided during the fermentation process.
Drying - Another option that you have available is to dehydrate foods and to dry them for long-term storage. Many of the same foods that can be preserved through fermenting and freezing can also be dried, including vegetables, meat, fruit, nuts and legumes. There are a variety of drying processes that are available, each of which has its own benefits and potential problems. In addition, you don't really need anything other than a dehydrator in order to properly dry food.
One of the benefits of dehydrating food for long-term preservation is that you can often keep much of the nutritional benefit that is lost through heating food excessively. The enzymes in the food, which are what we use to build protein in the body, are killed when you heat food above 115°F. It is possible to dehydrate food if you use a dehydrator below that temperature for an extended amount of time. You receive the same benefit of long-term food shortage but you do so while at the same time, allowing for a greater level of nutrition.
Pickling - Most of us are familiar with pickling because we eat pickles but the fact the matter is that it is a process that can be used for a wide variety of foods. When you pickle something, you soak it in a solution that contains an acid, such as vinegar, salt and/or alcohol. You need to make sure that you prepare the food properly, however, because pickling food in the wrong way can lead to foodborne diseases.
Curing - Both meat and fish can be cured effectively and stored for a very long time. It is a method that is similar to pickling, but the recipe is slightly different. In some cases, you can cure the meat or fish but you will still need to refrigerate or freeze it if you want to store it for the long term.
Smoking - This is an ancient method of preserving food. You can purchase a smoker for use at home or you can do it according to the old system that involves building a fire in a pit and covering the food over the fire to allow the smoke to do its work. It is a long-term process but it can be very effective and can even add some flavor to the food.
Choosing Your Storage - There are a variety of foods that can be stored successfully if you store them in the right condition. For example, keeping food underground in a basement can help to preserve it for an extended amount of time, and this is a popular option for storing grains, vegetables and nuts. The same area that will allow you to store those foods easily can also be used for the long-term storage of canned products as well.
Sealing - One other method of preserving food is to seal the food and restrict the air that is allowed to reach it. Sealing food can help to limit the spoilage but it does not stop it completely. It is still necessary for you to freeze or refrigerate the food, because the organisms that cause the food to spoils still exist.
7. Growing Your Canning Garden
One of the simple pleasures of canning your food is that you can enjoy the fact that you are preparing the food yourself. That is why it is important for you to also consider the entire process, and not just what takes place when you are working the pressure cooker. In this chapter, we are going to step backward and consider some benefits of growing your own canning garden. You will find that it is a very economical way for you to store food and it also provides you with additional benefits, including the personal satisfaction of being able to eat something year-round that came out of your garden.
First of all, we are going to assume that you have a limited amount of space to garden. Even if you do have an extended property, you will likely want to confine your garden to an area that is manageable. Fortunately, it is possible for you to grow a considerable amount of food in a very small space if you use raised bed gardening and plan things properly.
Raised bed gardening is a very popular way to grow vegetables, because it limits the amount of space that you use while at the same time, giving you easier access the plants that you are growing. You can build your raised beds out of almost anything, but it is important for you to avoid using something that would leach chemicals into the soil, including railroad ties or pressure treated lumber. It isn't necessary for you to build the garden up very high, just keeping it up six or 8 inches from the ground is all that is necessary to take advantage of what this type of gardening has to offer.
You should make the raised beds wide enough so that you can easily reach both sides of the garden when you are on one side. You may want to work your way around the raised beds as you are dealing with the garden, but if you keep it fairly narrow, it is easier for you to manage. Leave enough space between the beds so that you can easily work in the area and that you will be able to fit your mower comfortably between them. This will help to cut down on some of the time that it takes to care for your lawn and will give you more time for gardening.
Although it is possible to use topsoil from your property when you build raised beds, it is a better choice to import soil and to work with it specifically. You can add peat moss or something else in the soil to make it easier to work and it will also allow the plants to root and grow better.
Prior to each growing season, take some soil into your local co-op to have it tested. They will let you know what needs to be done in order to get the soil up to the best level possible. If you are growing an organic garden, make sure that they are aware of that fact before they make any recommendations so that they don't recommend a chemical that would take away from the organic nature of the food that you are growing.
The Internet provides you with plenty of information on the types of vegetables that can easily be grown in your area. You might want to try something easy, such as bell peppers or tomatoes, which can be grown in most areas with the proper care. With a few tomato plants in your garden, you would be amazed with how much fruitage you are able to harvest and as the season continues, it can even get away from you. It will certainly put your canning skills to the test as you try to keep up with the tomatoes that are coming off of the vine.
Finally, you want to make sure that you are feeding your garden properly. Although there are commercial treatments available for this purpose, it is a much better option to have a compost heap to use up any leftovers from the vegetables that you are canning and any other organic produce that you may have in your household. You can even use your lawn clippings, provided you don't treat your lawn chemically. Growing compost is relatively easy, as you only need to have water and heat, and the pile will produce its own heat. As long as you turn the pile every once in a while and allow air to get to it, the compost will be created quickly.
It can be a lot of fun to grow a canning garden, and you have many options that are available to you. By growing such a garden, you have the opportunity to take part in every step of the process. In addition, you will know exactly what is going in every canning jar.
8. Planning Your Storage for Convenience or Survival
It wasn't all that many years ago that every family had its own pantry. Inside of that pantry were foods that were stored in a variety of methods and in some way or another, the family would be able to eat for weeks or perhaps even months from that pantry alone. Unfortunately, society as a whole has gotten away from having such a pantry, but it is time for a revival of the practice. If you are getting into food storage and canning, you are taking the biggest step forward in having a pantry of your own.
Having a survival pantry does not need to be difficult, but there are some things for you to consider. First of all, you need to think about the requirements of your family nutritionally and have enough food available for a specified amount of time. That amount of time may differ from one family to another, but you should have a minimum of 3 days’ worth of food and water to survive. Of course, if you are canning and taking part in other ways of preserving food, you will be able to stockpile food for weeks or perhaps even months.
Choose a location that is out of the way yet easily accessible for your survival pantry. Try to choose an area of the home that is relatively cool, dark, and remains at a stable temperature. The best choice for this purpose is your basement, although not every household in the United States has a basement available. You can also choose the area underneath the staircase if one is available. As long as you're able to access the food and it is not subject to extreme temperature changes, it is a good choice.
Have some type of organization available for the survival pantry so that you can find what you need easily. Try to put any glass canning jars lower on the shelves or secure them in a way that they will not fall off the shelves in the event of a natural disaster, such as an earthquake. You should also store other items, including seeds for sprouting, boxed and bagged foods and some additional canned foods that you can purchase at the grocery store. Having a variety of foods available will help to keep things interesting when it comes time to break into your storage.
Finally, make sure that you have a system available so that you know what is in the pantry and when it needs to be used. The last thing that you would want to have happen is for the food to spoil before you're able to use it. Any jars that are canned should be clearly labeled and you should rotate them on a regular basis. If you purchase any canned goods, they should have the sell by date listed on the package.
9. Learning to Love Canning
For some families, canning is a hobby that is somewhat nostalgic of what they may have experienced with their parents or perhaps even their grandparents. For others, however, it is a matter of improving your odds of survival, either due to some form of natural disaster or simply because it is much more affordable to live when you can your own foods. In either case, it is a pastime that has many benefits, and those benefits are open to you, once you take a step in the right direction.

When you begin canning, the process is going to seem somewhat foreign to you but with a little bit of perseverance, you can learn about the process and even come to enjoy it. In fact, many people look forward to the time in which they are able to can their own foods because of the fact that eventually, they will be enjoying the food during the time when they are not able to grow it.
Don’t be satisfied with simply learning about the canning process. Take the time to delve into it and learn more about it as you go along. You will be surprised with how diversified the options are and when you begin to take advantage of them, you will reap the benefits very quickly. In addition, you will come to love the hobby and all that it has to offer.